How To Progress Corrective Exercise - From The Ground To Upright
Jul 28, 2022
One of the things we pride ourselves on here at the gym is our ability to effectively integrate prep drills and weightroom exercises together to maximize performance, mobility, and movement.
However, in order to do that, we also need to be able to choose effective exercise progressions for the right person at the right time.
Ground-based drills don't have much use if we can't eventually get someone upright moving through a position that is actually relevant to their goal(s).
If you'd rather watch than read, see below:
Here is one example of how we can do that:
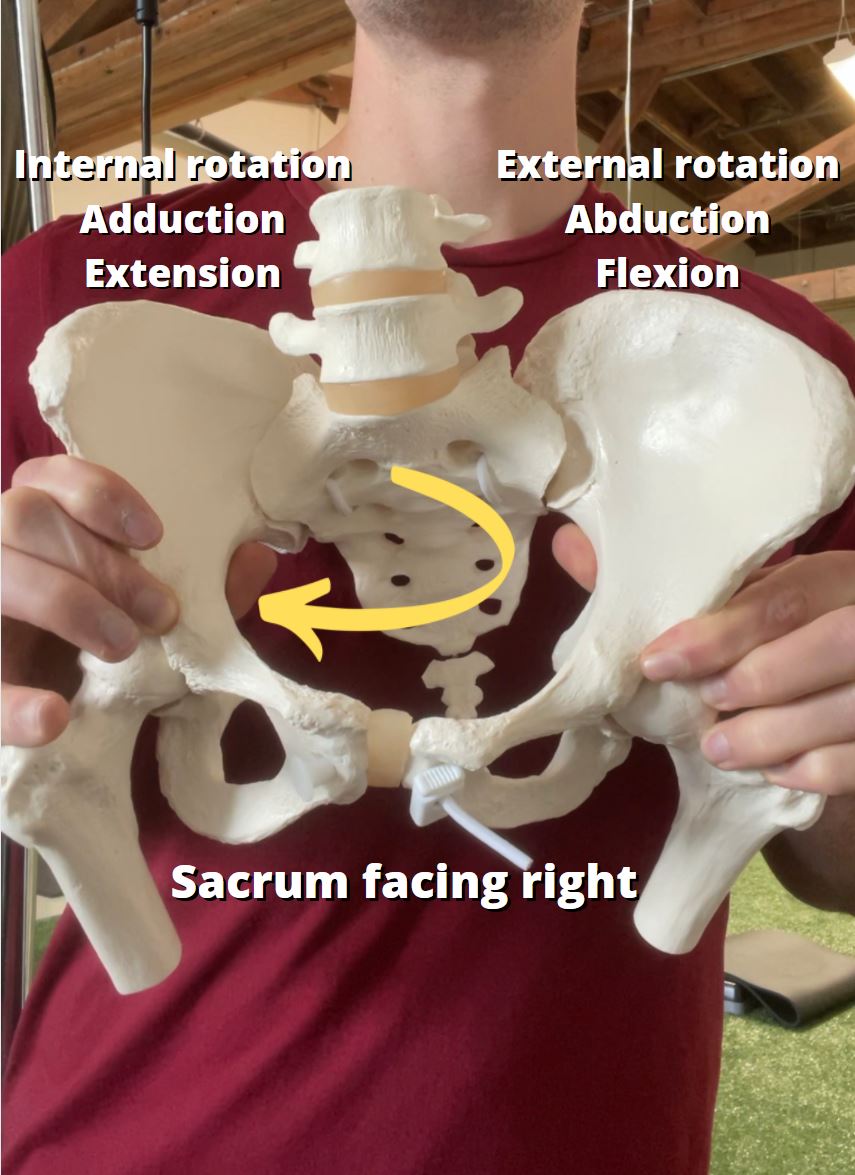
Let's say we have someone who is limited in hip extension and the ability to turn their pelvis to the left side.
This would mean they have a forwardly tipped pelvis that is turned right - a common presentation.
Step 1: Use lots of references
What we first want to do is create an ability to do that very easy position where there are lots of references. What that essentially means is "stuff on the body touching other stuff".
The more the body is in contact with the ground or a wall, the more "referenced" a position is. This means it is a safer position for the body to learn how to find and feel the right things.
Over time, we can remove references and get someone more upright. This is something we spend a lot of time on mastering in my Biomechanics Course.
The first thing we can do is improve the ability for the pelvis to turn left.
A general guideline is that if you have one leg in flexion and one in extension, the pelvis will turn towards the leg that is more flexed.
Therefore, we could start them in an easy position such as on their back where we can start to train this:
Step 2: Remove references
At this point, getting them to slowly get off the ground is ideal. We will know it's time to progress them because the following two things will happen:
- They can always find and feel the correct position and right muscles with ease
- The exercise will create immediate changes in range of motion, which ideally will last and be present over time
Once they achieve that consistently, we can progress the same biomechanical ideas to something like this:
To get them even more upright, we can choose something like this:
Step 3: Load in upright positions
Keep in mind that we can load them at any point as long as it is a responsibly-chosen exercise. But in terms of being able to own upright, dynamic positions, a progressive exercise selection such as above is very helpful.
If you're looking for more strategies to improve movement to help your clients feel great, check out my free webinar: 5 Strategies To Help Your Clients Feel 85% Better Immediately
Example #2: Limited Internal Rotation
Another common example is missing internal rotation. Let's keep with the left side example and say they can't access proper internal rotation on that side.
We can keep in mind the same progression principles as above, but with internal rotation, there are a few things to consider:
#1: We want to promote sacral nutation and innominate bone internal rotation - this is maximized in deeper levels of hip flexion (hip bend), around 60-100 degrees:

#2: Muscles that promote internal rotation are primarily the
- Inner hamstrings
- Adductors
- Gluteus Medius (anterior fibers)
- Obliques
So we want to integrate those muscles slowly together over time, but start easy.
Generally I'll start with the hamstrings and progressively integrate other muscles over time.
A great start position could be something as simple as the 90/90 hip lift, then adding a slight hip shift on the left to target more gluteus medius and adductors:
We can then pick progressively more challenging exercises from the ground-up there. Standing supported positions are very helpful for this. It depends on the person, but I generally pick something along the lines of this:
Technique used with permission. Copyright © Postural Restoration Institute®2022. www.posturalrestoration.com
Finally, we have:
Technique used with permission. Copyright © Postural Restoration Institute®2022. www.posturalrestoration.com
Keep in mind this is just an example and not something everyone should follow. The principles are what matter.
Step 3: Loading
To load the position of internal rotation and integrate those muscles together, I am a fan of split stance positions where we can bias internal rotation on one side in particular. Here are a few examples of how you can do that, from easiest to most challenging:
Don’t miss out on free education
Join our email list to receive exclusive content on how to feel & move better.
